Android has three different navigation patterns: stack navigation, tab navigation and drawer navigation. Stack and tab navigation are pretty self-explaining, but the drawer navigation is a bit more complex. It enables you to add a panel with the main navigation options to the left edge, that is hidden most of time but revealed when swiping from the left edge to the right on the screen or by tapping the menu button in the top left corner.
In the following part I will describe how you can add a DrawerLayout with Fragments that load when the user taps a navigation option. To implement this, we need to add the Android Support Library v7 AppCompat from the Component Store.
After adding this we need to create a new layout for the page with a DrawerLayout that has two child elements. The first child is the main content of the page, in this case we want to load fragments so we need to add a FrameLayout. The second child is the menu panel with the navigation options, a ListView is absolutely fine for that.
<?xml version="1.0" encoding="utf-8"?>
<android.support.v4.widget.DrawerLayout
  xmlns:android="http://schemas.android.com/apk/res/android"
  android:id="@+id/drawerLayout"
  android:layout_width="match_parent"
  android:layout_height="match_parent">
    <!-- Your main content -->
    <FrameLayout
      android:id="@+id/frameLayout"
      android:layout_width="match_parent"
      android:layout_height="match_parent" />
    <!-- ListView with navigation options -->
    <ListView
      android:id="@+id/drawerListView"
      android:layout_width="240dp"
      android:layout_height="match_parent"
      android:layout_gravity="start"
      android:choiceMode="singleChoice"
      android:background="?android:attr/windowBackground" />
</android.support.v4.widget.DrawerLayout>
After adding the layout, we need to add the menu button to the ActionBar:
_drawerLayout = FindViewById<DrawerLayout>(Resource.Id.main_drawerLayout);
_drawerToggle = new ActionBarDrawerToggle(this, _drawerLayout,
    Resource.String.DrawerOpenDescription, Resource.String.DrawerCloseDescription);
_drawerLayout.SetDrawerListener(_drawerToggle);
ActionBar.SetDisplayHomeAsUpEnabled(true);
For the Toggle Descriptions we need to add two strings to your Resources/values/Strings.xml file:
<?xml version="1.0" encoding="utf-8"?>
<resources>
    <string name="DrawerOpenDescription">Open navigation drawer</string>
    <string name="DrawerCloseDescription">Close navigation drawer</string>
</resources>
We need to make sure that clicks on the ActionBar will be forwarded if the ActionBarDrawerToggle is clicked, so we need to override the OnOptionsItemSelected method.
public override bool OnOptionsItemSelected(IMenuItem item)
{
if (drawerToggle.OnOptionsItemSelected(item))
	return true;
	switch (item.ItemId)
	{
		default: break;
	}

	return base.OnOptionsItemSelected(item);
}
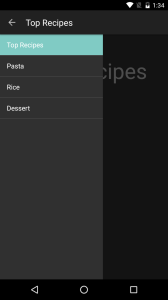
The user will be able to navigate to different fragments so I added to arrays, one Array for the Fragments and another one for the titles:
Fragment[] fragments = new Fragment[] { new TopRecipesFragment(),
    new CategoryPastaFragment(), new CategoryRiceFragment(),
    new CategoryDessertFragment() };
String[] titles = new string[] {"Top Recipes", "Pasta",
    "Rice", "Dessert"};
For the navigation ListView items you need a layout, I called it NavigationOption.axml and only added a TextView, that should be enough for this demo:
<?xml version="1.0" encoding="utf-8"?>
<TextView
  xmlns:android="http://schemas.android.com/apk/res/android"
  android:id="@+id/navOptionTextView"
  android:layout_width="match_parent"
  android:layout_height="?android:attr/listPreferredItemHeightSmall"
  android:gravity="center_vertical"
  android:paddingLeft="16dp"
  android:textAppearance="?android:attr/textAppearanceListItemSmall"
  android:background="?android:attr/activatedBackgroundIndicator" />
After adding the layout, we can fill the ListView with some navigation options that the user can choose from later on and you need to add an event handler to navigate to another fragment.
drawerListView = FindViewById<ListView>(Resource.Id.drawerListView);
drawerListView.Adapter = new ArrayAdapter<string>(this,
    Resource.Layout.NavigationOption, Resource.Id.navOptionTextView,
    titles);
drawerListView.ItemClick += (object sender,
    AdapterView.ItemClickEventArgs e) => NavigateToFragment(e.Position);
drawerListView.SetItemChecked(0, true);
NavigateToFragment(0);
The navigation to a fragment is implemented in the NavigateToFragment method, that will take a position (from fragments array) to navigate to the corresponding Fragment and display the proper title.
void NavigateToFragment(int position)
{
	base.FragmentManager.BeginTransaction().Replace(
             Resource.Id.frameLayout, fragments[position]).Commit();
	this.Title = titles[position];
drawerLayout.CloseDrawer(drawerListView);
}
That’s it, we now have a pretty awesome DrawerLayout navigation that is useful in many different scenarios.
